Comprehensive Guide to Free Website Hosting - Part 1
If you ever decided to start a blog or a simple website, the biggest issue you would immediately come across will be finding a half decent hosting solution that doesn’t cost a ton. One that did not claim to be unlimited everything for half a dollar on the homepage and when you click on the buy button, tell you that the unlimited all was only for the ten times priced plan.And that too wasn’t actually unlimited as claimed but conditions apply. This frustrated me enough to try and figure out a low-cost solution that could have a blog or a website which looked modern and was responsive. Read on to see all the solutions I could come up with.
There are basically 3 ways to achieve freedom from hosting companies.
Now, before I take you through how to, let me just explain the basics of how web works. In brief, when you go to a website or click on it's link, your browser receives is a HTML file along with the images and CSS files that go along with it. Your browser shows them in a visual way. These files need to be on a server though. A server is basically a computer that is always on and connected to the internet. Simple enough right? Well, this kind of hosting is called static hosting. As all the files are ready and just need to be served by your browser. Responsiveness can be achieved using JavaScript and such.
Sometimes you will need more sophistication. Say a blog that does more. Such as having share buttons and auto sharing options. All this being easily maintained. An example for this is the ever-popular WordPress. It is called a CMS or a content management software. This is built on something called PHP. I won’t go into too many details here, but you are going to need some processing power to use this. That is, a computer that can run programs. The hosting companies basically offer you this. A shared computer where you can host your content and use some processing power. Shared to reduce costs or a dedicated system for more processing power. This kind of hosting is called dynamic hosting.
Now, let’s go ahead and figure out how to avoid these hosting companies.
-
Static Hosting
- Blogspot
- Google Sites
- Jekyll
- Hugo
- Netlify
- Forestry
-
Sway and Hybrid Solutions
-
Cloud Computing
- AWS
- Azure
- GCP
1. Static Hosting
The first way is to go for static hosting. Now, before you brush this method away, you need to understand that things have come a very long way since the time of simple static hosted sites. You get very modern and elegant websites that are responsive. If you want a blog management system, you can get them too using services like Netlify CMS and Forestry using static site generators like jekyll and Hugo. These make it very easy to have a very decent website or a blog. And one of the greatest benefits of static hosting is that they blazingly fast and secure. Something that is quite hard to achieve using dynamic hosting.
1.1 Blogspot
The first option to have static hosting is to use the good old Google blogspot. Initially, I had a very bad impression of Google blogspot as those sites tended to have very poor quality of websites and themes. They looked very amateurish and overall just sucked. That was until I found out that it was possible to have custom themes installed on it and that you could use a custom domain with blogspot.
1.1.1 Custom Domain
There are just 2 steps to using blogger with a custom domain after you have registered to blogger.
1. Click on settings -> Basic
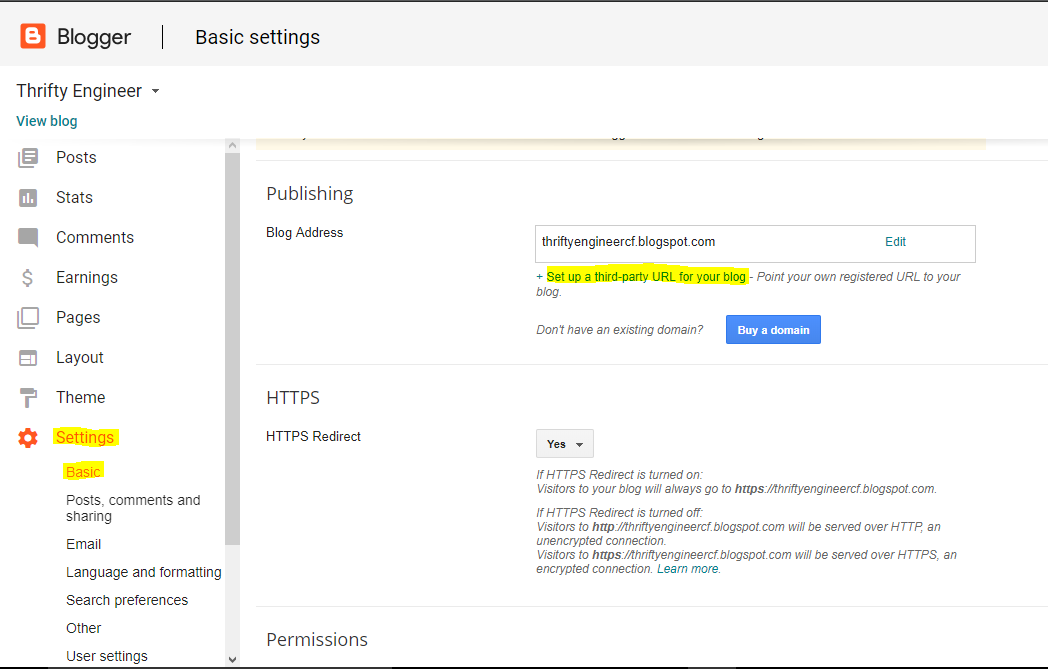
2. Scroll to Publishing and click on “Set up a third-party URL for your blog”
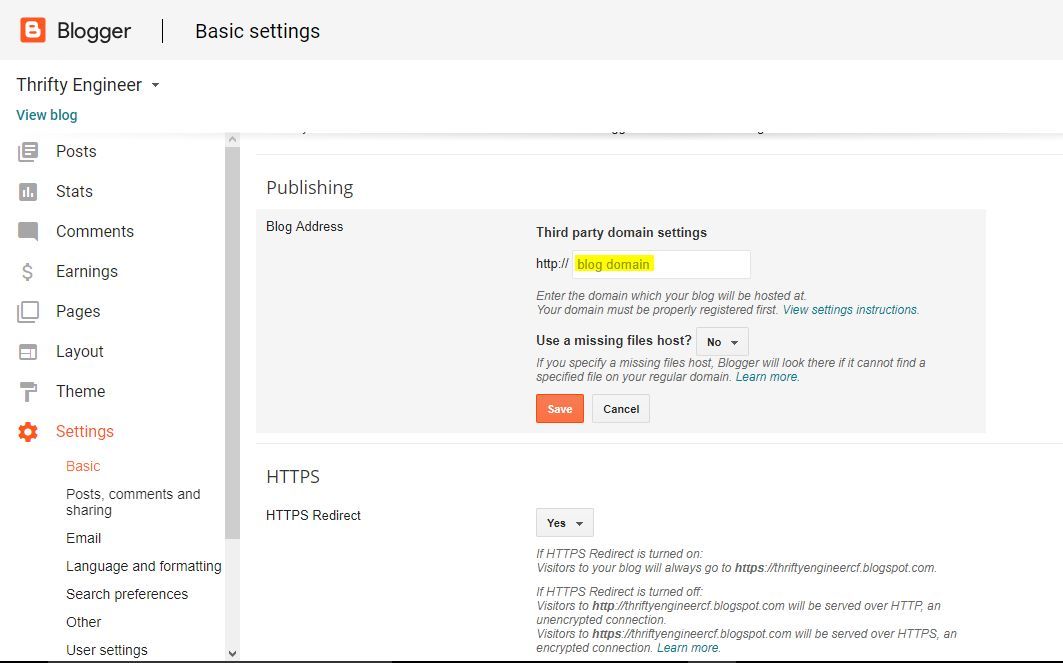
That’s it! Just enter your domain address and add the CNAME records that Google asks you to and that will point your custom domain to the blogger managed blog.
1.1.2 Themes
As I mentioned before, the built-in themes in blogger are not that good. They look old and unresponsive. To overcome this issue, we will use custom themes like this one:

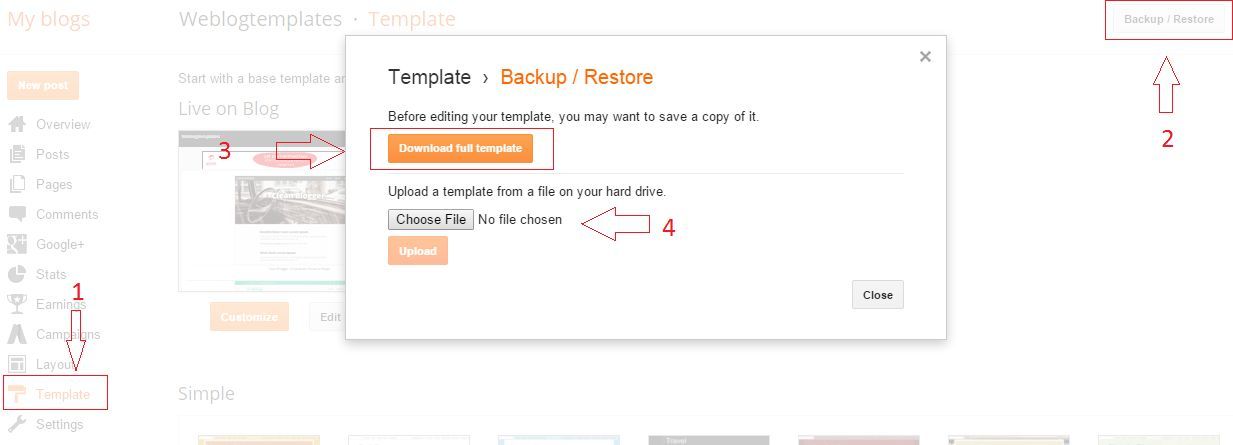
To install, just download the file and extract the xml file. Then, clickTemplate -> Backup / Restore -> Choose File -> Select XML file
I highly recommend this theme: pixel-template.blogspot.com

You can download the XML here.
All It’s documentation can be found here.
Frankly, these themes are so good, you will just fall in love once you get the right one! There might actually be no point for most to go any further.Nonetheless, if you have more/different requirements or just wish to learn more and know the other options you have available with you, continue along.
1.2 Google Sites
Like blogspot, Google also has a lesser known service called Google sites. These sites are stored on your google drive. Using this is extremely simple. Here are the steps:
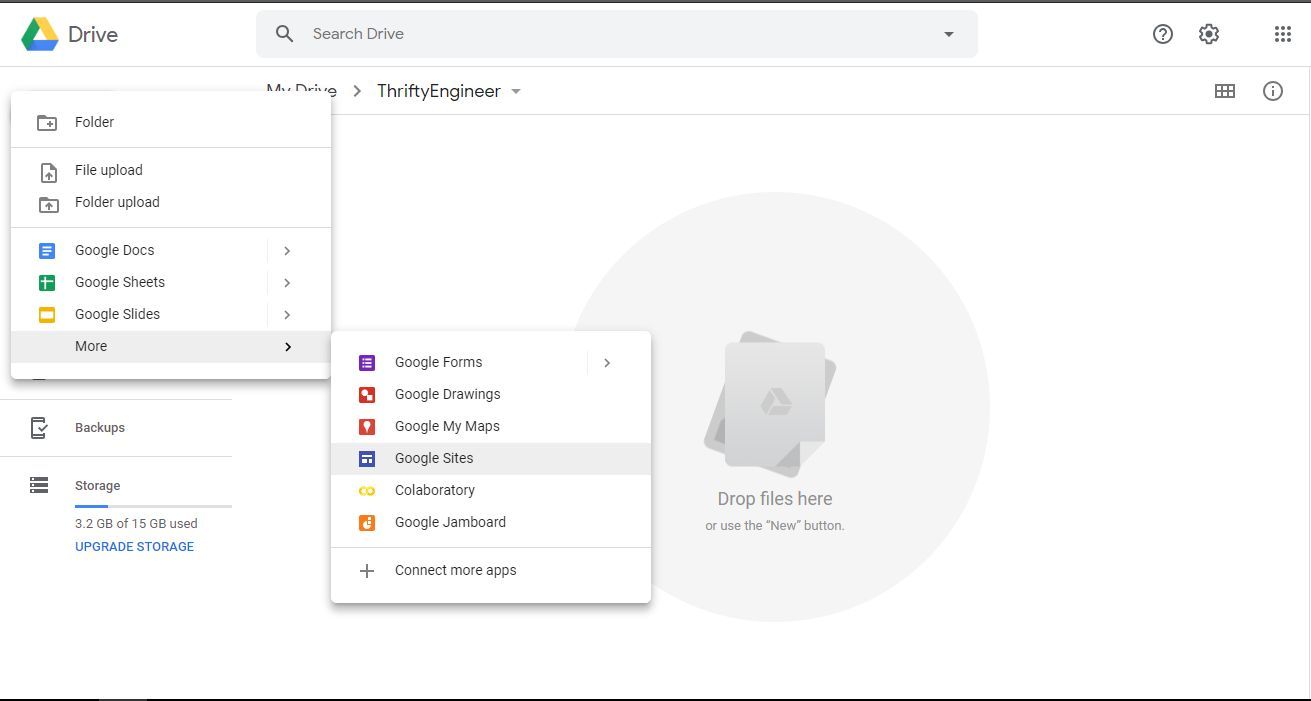
- Go to your google drive and navigate to where you want your website to be stored.
2. Click on New->More->Google Sites. Like shown below:
3. Then You will be presented with something like this:
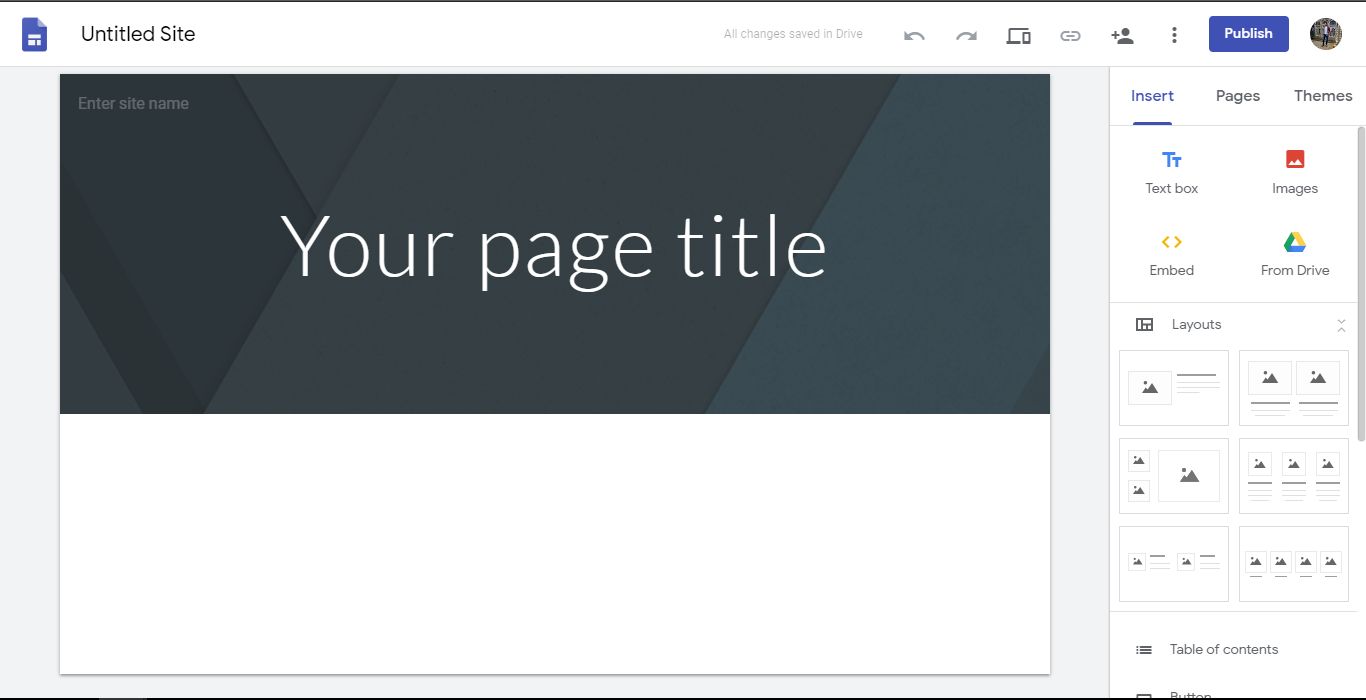
4. Everything here is rather straightforward. So build your website and we will go further to showing you to use custom domains with Google Sites.
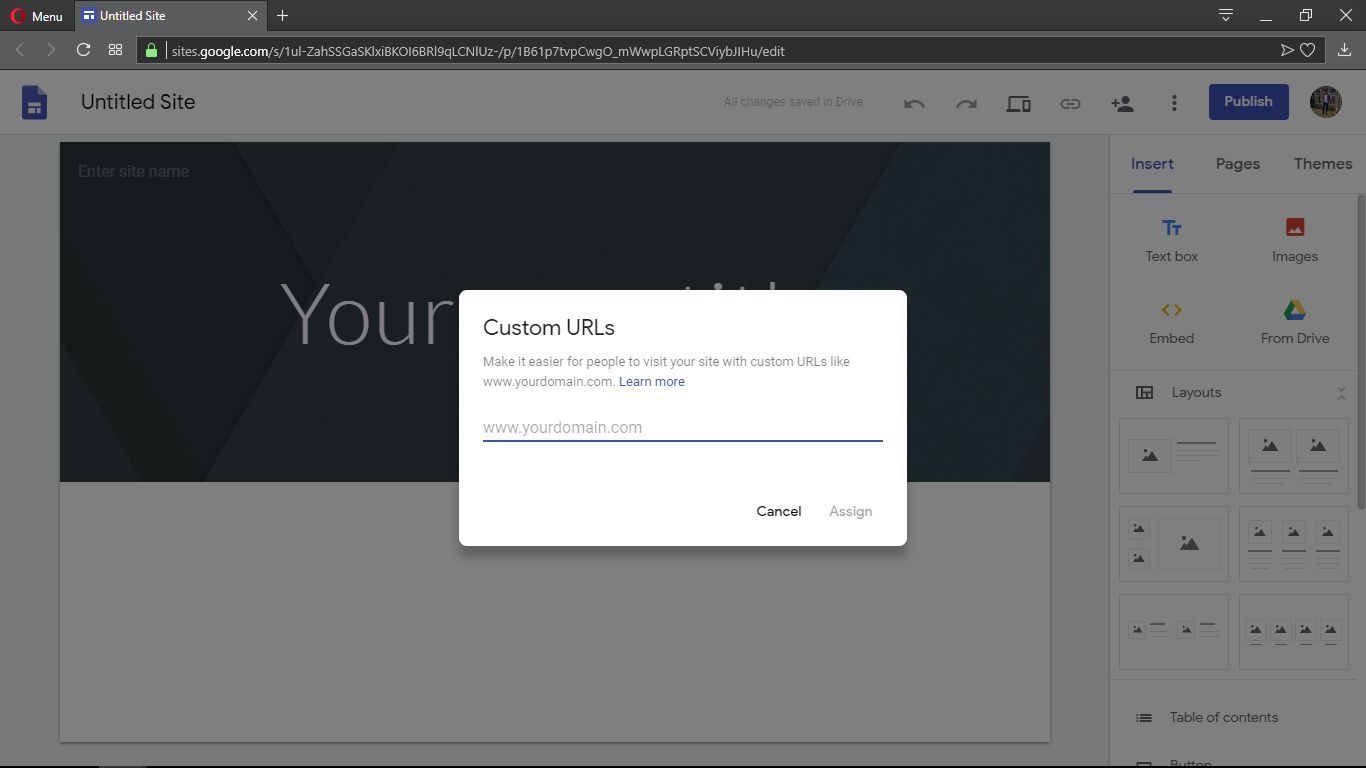
5. To use custom domains, just click on the three dots and click on Custom URLs. Here:
6. Then enter your domain.
7. Before you can use your custom domain, you will have to verify the ownership of your entered domain. To do so, follow the instructions you get and add the given verification code in the next screen:
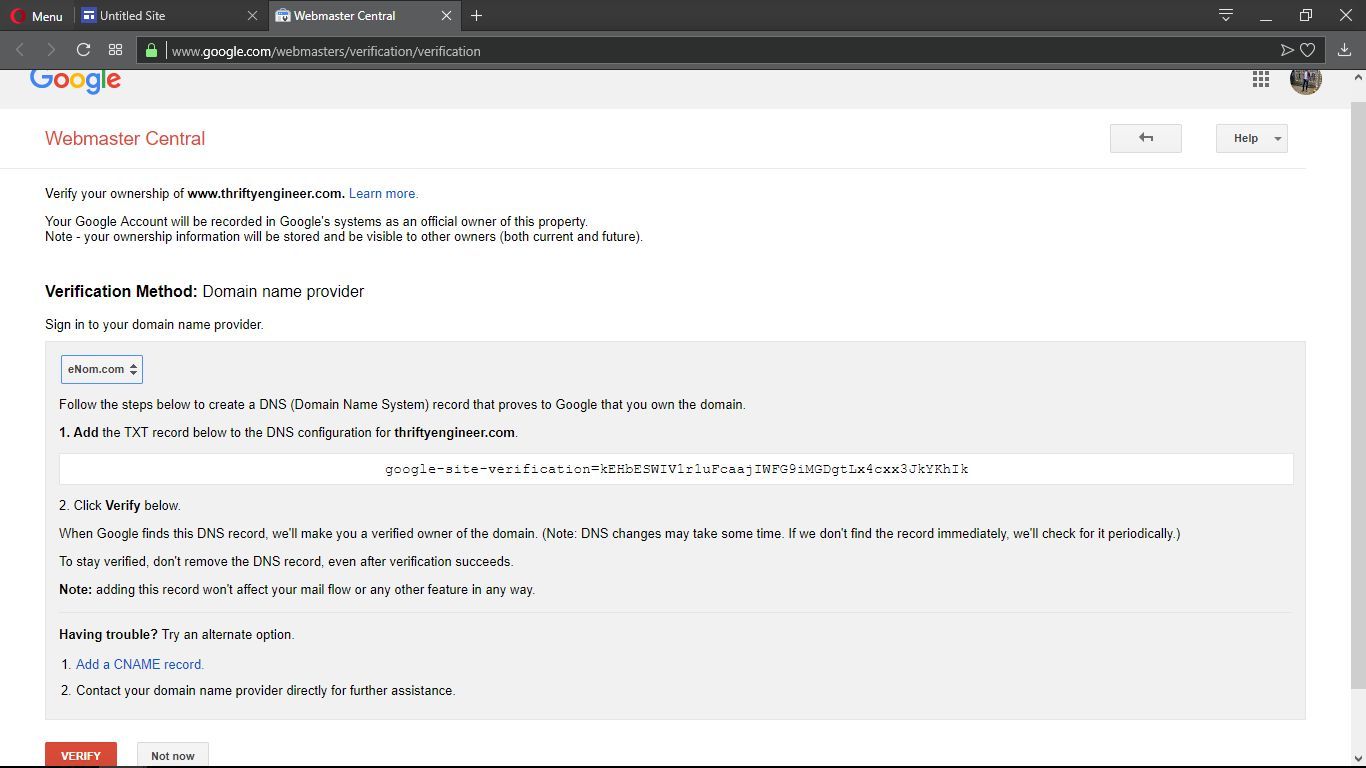
8. You will also have to add a CNAME record for your website in your registrar’s panel. It needs to point to ghs.googlehosted.com:
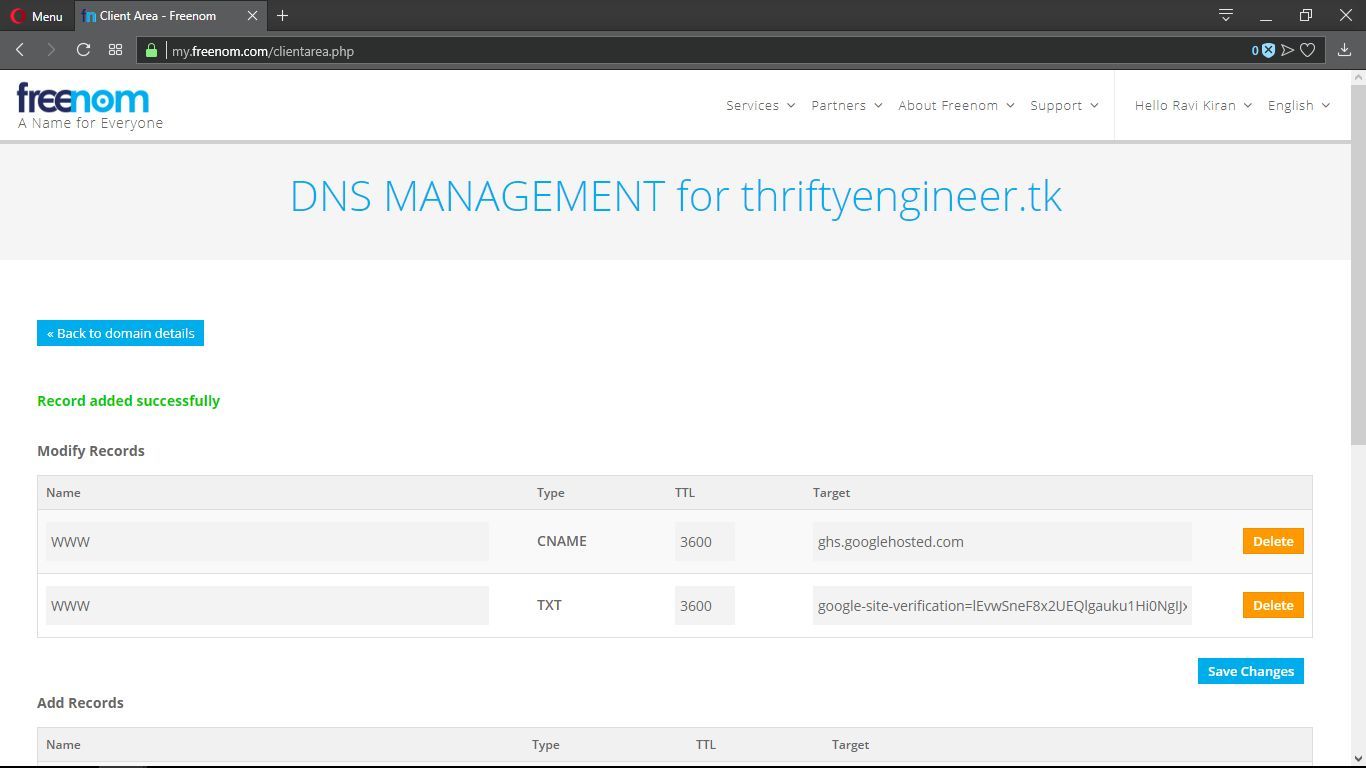
9. Once that’s done, return to the ownership page and click on verify.
10. On your Google Sites page, click Publish once you are done building your website.
1.3 Jekyll
Jekyll is an interesting new thing that is called a static site generator. What is a static site generator you ask? Well, it’s something that creates a bunch of static files by combining different files such as a header and a footer to each page. These static files are then served directly to the browser without any further processing. This helps you avoid having to edit every single page manually. It has gotten extremely popular in the past couple of years owing to the large number of themes and overall community support for it. Jekyll does require you to have some coding experience and hold on command line though. So be warned!
1.3.1 Jekyll Tutorial
If you prefer video tutorials, I would recommend this YouTube playlist by
Giraffe Academy that is mentioned on the official website of Jekyll. Follow this link: https://jekyllrb.com/tutorials/video-walkthroughs/
Here is a very basic tutorial of using Jekyll:
Installation via RubyInstallerPermalink
The easiest way to run Jekyll is by using the RubyInstaller for Windows.
RubyInstaller is a self-contained Windows-based installer that includes the Ruby language, an execution environment, important documentation, and more. We only cover RubyInstaller-2.4 and newer here, older versions need to install the
Devkit manually.
-
Download and Install a Ruby+Devkit version from RubyInstaller Downloads. Use default options for installation.
-
Run the ridk install step on the last stage of the installation wizard. This is needed for installing gems with native extensions. You can find addtional information regarding this in the RubyInstaller Documentation
-
Open a new command prompt window from the start menu, so that changes to
the PATH environment variable becomes effective. Install Jekyll and Bundler
via:gem install jekyll bundler -
Check if Jekyll installed properly:
jekyll -v
That’s it, you’re ready to use Jekyll!
Installation via Bash on Windows 10Permalink
If you are using Windows 10 version 1607 or later, another option to run Jekyll is by installing the
Windows Subsystem for Linux.
Note: You must have Windows Subsystem for
Linux enabled.
First let’s make sure all our packages / repositories are up to date. Open a new Command Prompt instance, and type the following:
bash
Your Command Prompt instance should now be a Bash instance. Now we must update
our repo lists and packages.
sudo apt-get update -y && sudo apt-get upgrade -y
Now we can install Ruby. To do this we will use a repository from BrightBox,
which hosts optimized versions of Ruby for Ubuntu.
sudo apt-add-repository ppa:brightbox/ruby-ng

sudo apt-get update

sudo apt-get install ruby2.5 ruby2.5-dev build-essential dh-autoreconf
Next let’s update our Ruby gems:
gem update
Now all that is left to do is install Jekyll.
gem install jekyll bundler
(Note: no sudo here.)
Check if Jekyll installed properly by running:
jekyll -v
And that’s it! The installation and setting up of everything that is.
Once the above is completed, open your PowerShell or terminal and change
directory to where you want your site to reside. Once there, type in
jekyll new project_name
You should find something like this:
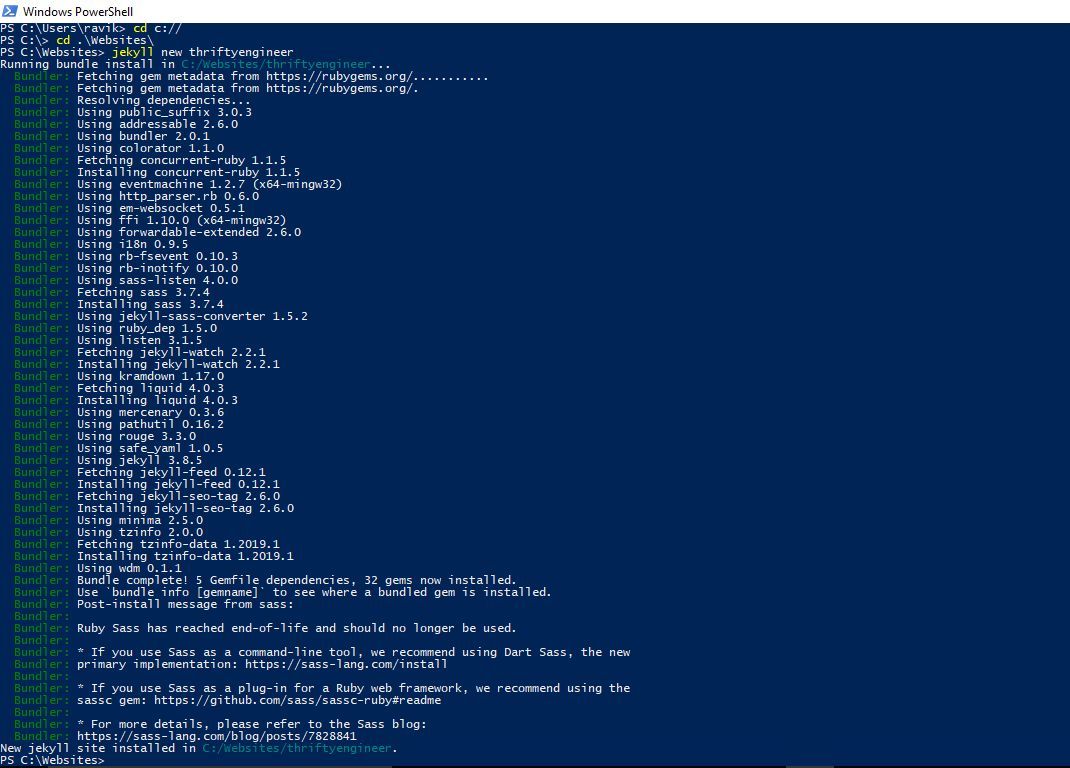
This will take a moment. Once done, you will find a new folder by the name of
your project. Change directory into it and type in:
bundle exec jekyll serve
You should find something like this on your powershell/Terminal:
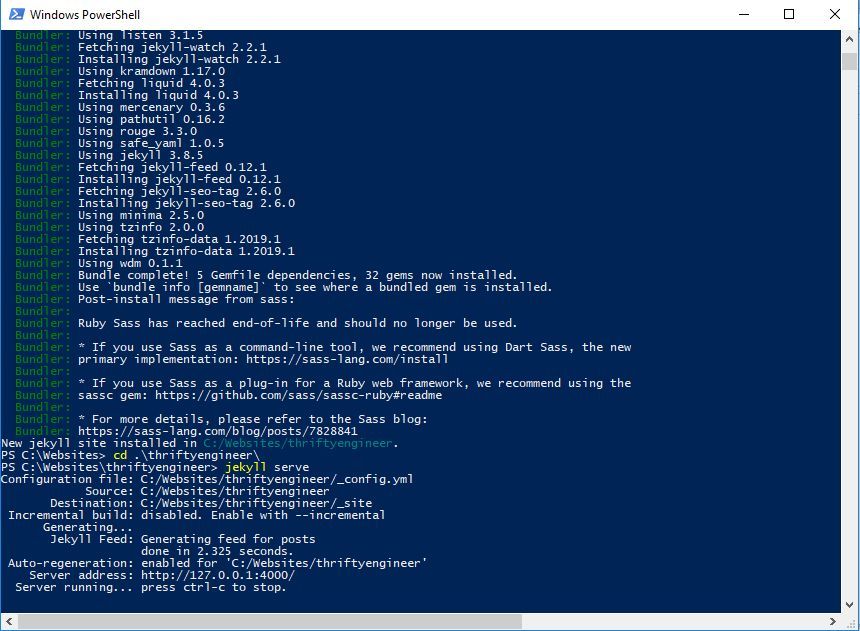
This should build and serve a local website. You can view it by opening your browser and typing in:
http://127.0.0.1:4000
You should find something like this:

Well, there you go! You got yourself a wonderful Jekyll generated website. Now I am not going to get into all the details of using Jekyll and building your website as there are multiple other sites and videos out there that have done the same already. However, I will just touch upon themes as that can be a bit confusing.
1.3.2 Jekyll Themes
Official Jekyll themes are published on https://rubygems.org. To find themes,
just visit that site and search for “Jekyll themes” or such. You will easily
find thousands of Jekyll themes.
For the sake of this example, let us install a theme called “krad”. It looks
like this:
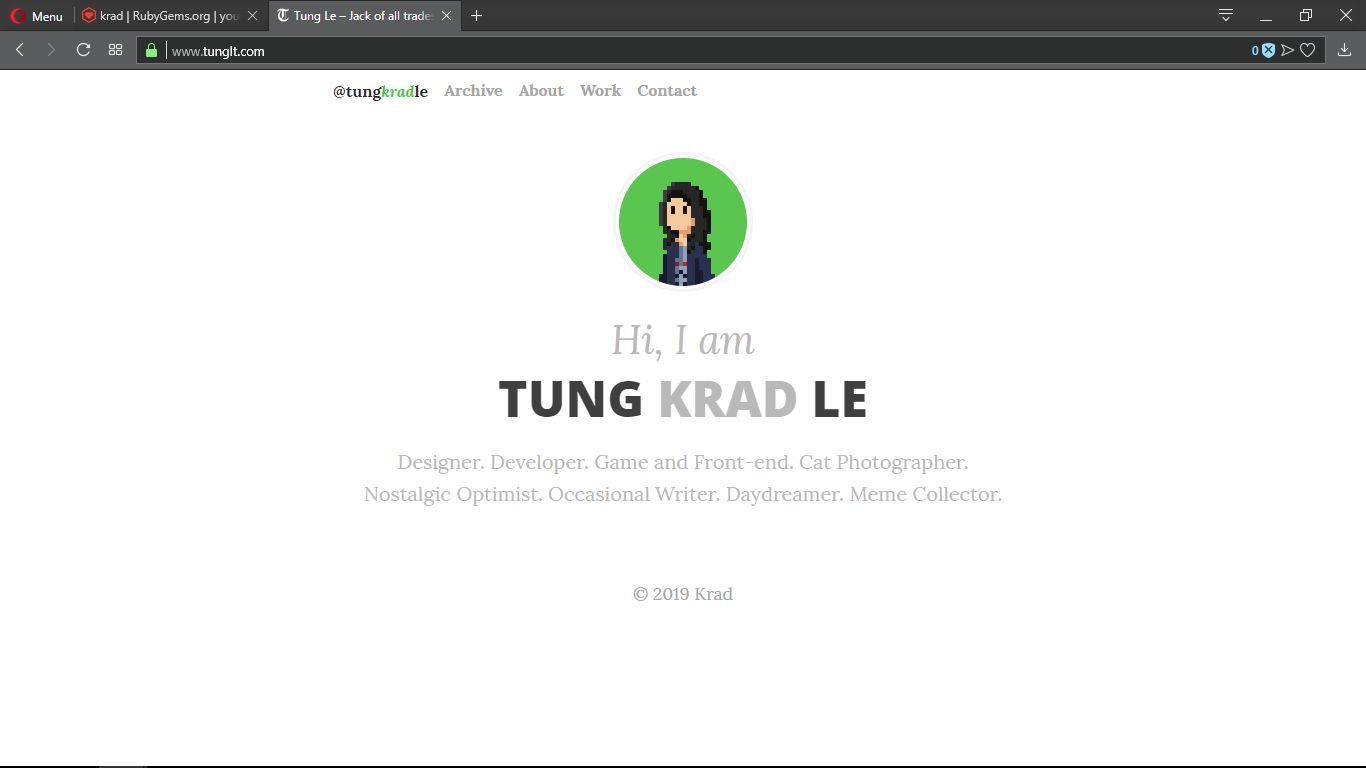
It’s from the theme creator’s personal page BTW. Nice guy he is. You can visit
his blog here: https://www.tunglt.com
Here is the link to the theme page on rubygems: https://rubygems.org/gems/krad
To use these themes in your project, follow these steps:
- Go to the site folder (the place where you did a “Jekyll new”)
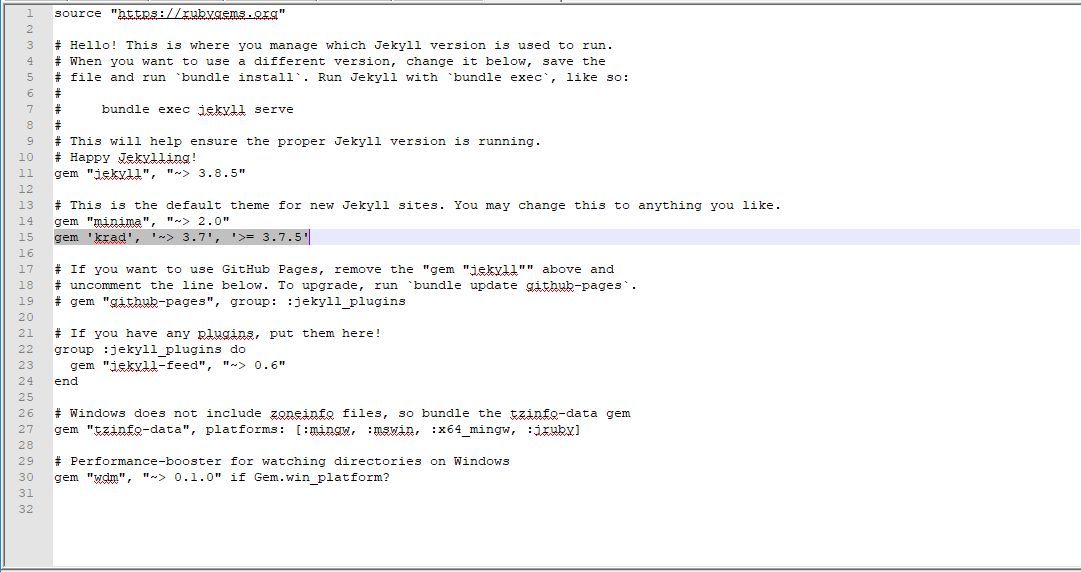
2. Open the file named “Gemfile” using a text editor.
3. Add gem 'krad', '~> 3.7', '>= 3.7.5' under the themes location. Like this:
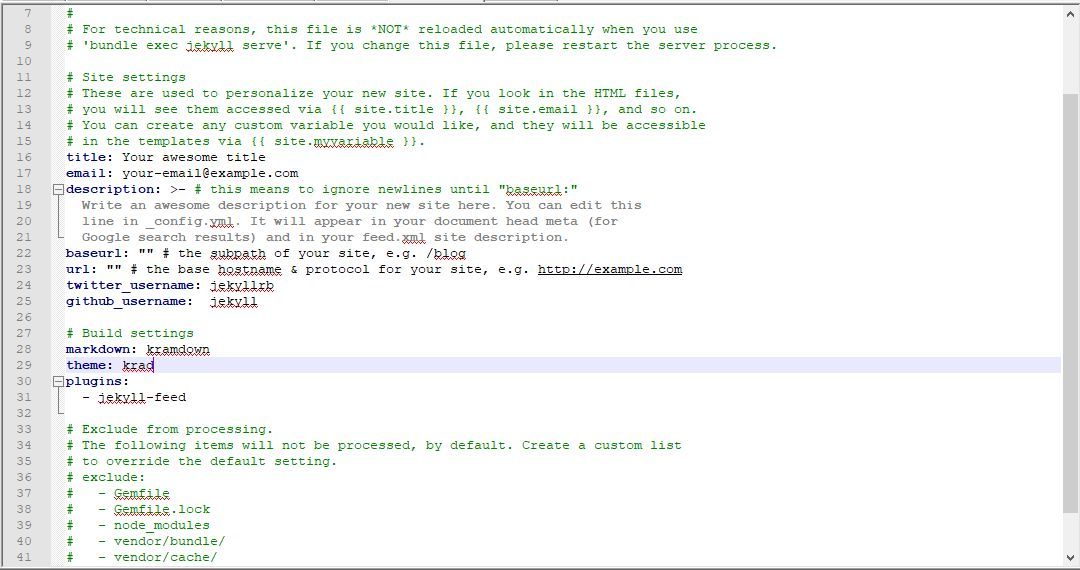
4. Then open a file name “_config.yml” and change the theme to krad from minima. Like this:
Now if you are wondering where I got what to insert into the gemfile, well, you will find that on the rubygems page or the github page of that theme. Here is a snapshot from the rubygrms.org website for example:

1.3.3 Jekyll Plugins
In a similar fashion, you can install plugins to improve your seo and other such things. Like wordpress plugins. I am not going to go into detail of doing this as it is exactly the same as installing themes. I have included this part just to make to aware of the existence of plugins.
1.4 Hugo
Hugo is a static site generator as well with the difference that it is written the language Go instead of Ruby. I am not going to detail the instructions as the official site of hugo itself has plenty of well written documentation of both technical as well as less technical users. I will just link up the sites here and detail things further when I get time. Either in this post itself or in another post.
1.4.1 Hugo Tutorial
Installation: https://gohugo.io/getting-started/installing
Usage: https://gohugo.io/getting-started/quick-start/
1.4.2 Hugo Themes:
https://gohugo.io/getting-started/quick-start/#step-3-add-a-theme
1.5 Netlify
As you might have observed in the Jekyll and Hugo sections, it isn’t exactly
easy to use them for the average blogger who wants to just write content. It requires you to do quite a bit of coding and doesn’t exactly have an easy CMS like experience where you can get a rich text editor like WordPress. This is where Netlify enters.
Netlify is a service that builds the website using your choice of static site generator like Jekyll or Hugo or any of the others. This makes it easy for any simpleton to use static site generators from the comfort of their browsers. With comparatively little coding experience. It also helps you to get multiple people registered as authors as well as create communities along with giving you a CMS like rich content editor. Netlify has a regular website builder as well as a CMS based customizations. We will only focus on the later as that is what a blogger needs.
Netlify CMS Guide
-
Head over to https://www.netlifycms.org
-
Click Get started
-
Select an SSG (Hugo, Gatsby or Middleman)
-
There are advantages and disadvantages of each one. If you are a beginner,
just go for Hugo. It’s quite popular and growing every day. -
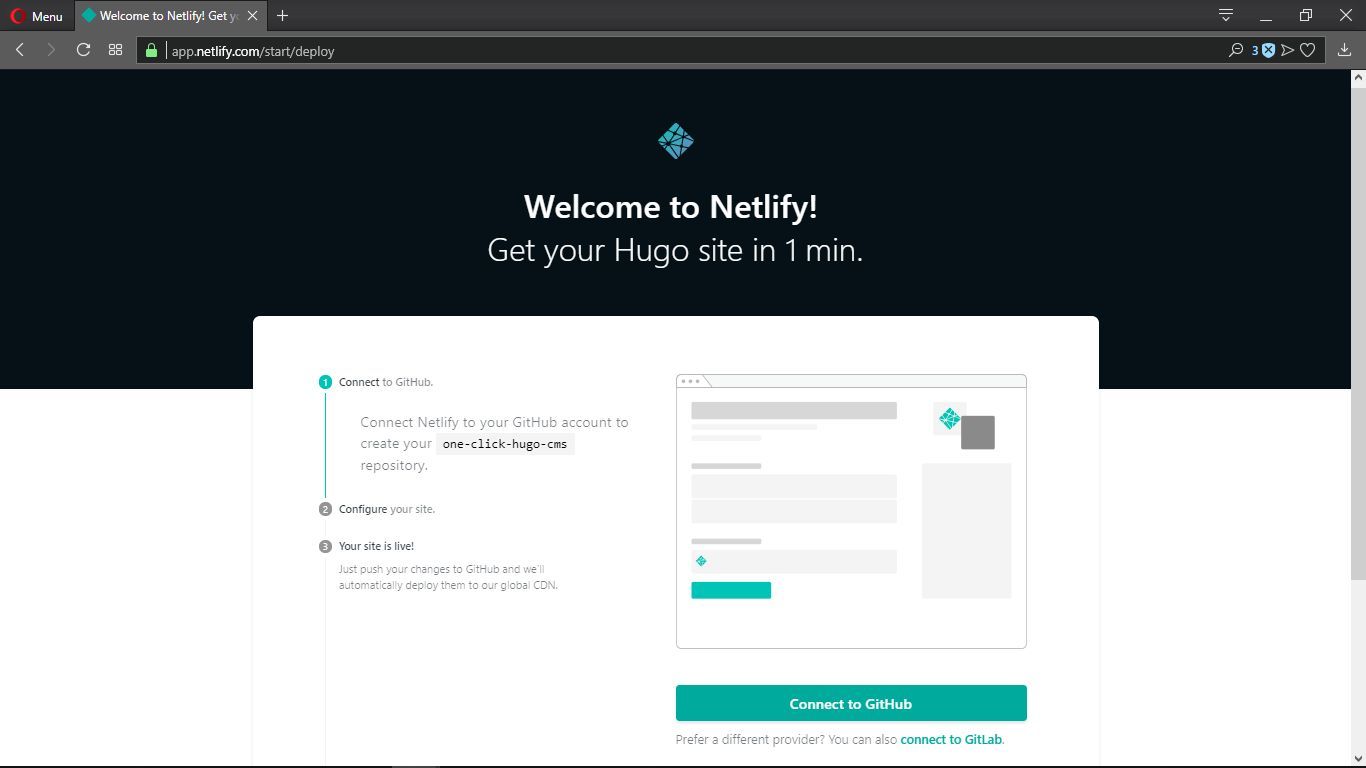
Click on Deploy to netlify
-
If you already have a Netlify account, login. Else register.
-
Once done, you will be redirected to a page like this:
-
Connect to either GitHub or GitLab
-
You will get a mail asking you to join a site. Accept the invite and enter a password when asked for.
-
Once done, you will be taken to the admin page and you are ready to go.
You may delete the existing posts and create new ones. There is quite a bit more to learn here with respect to front matter and other things. But I will leave that to another post. For now, let me just show you how to add a custom URL to it.
Custom URLs
- Go to Domain Management -> Custom domains -> Add custom domain:
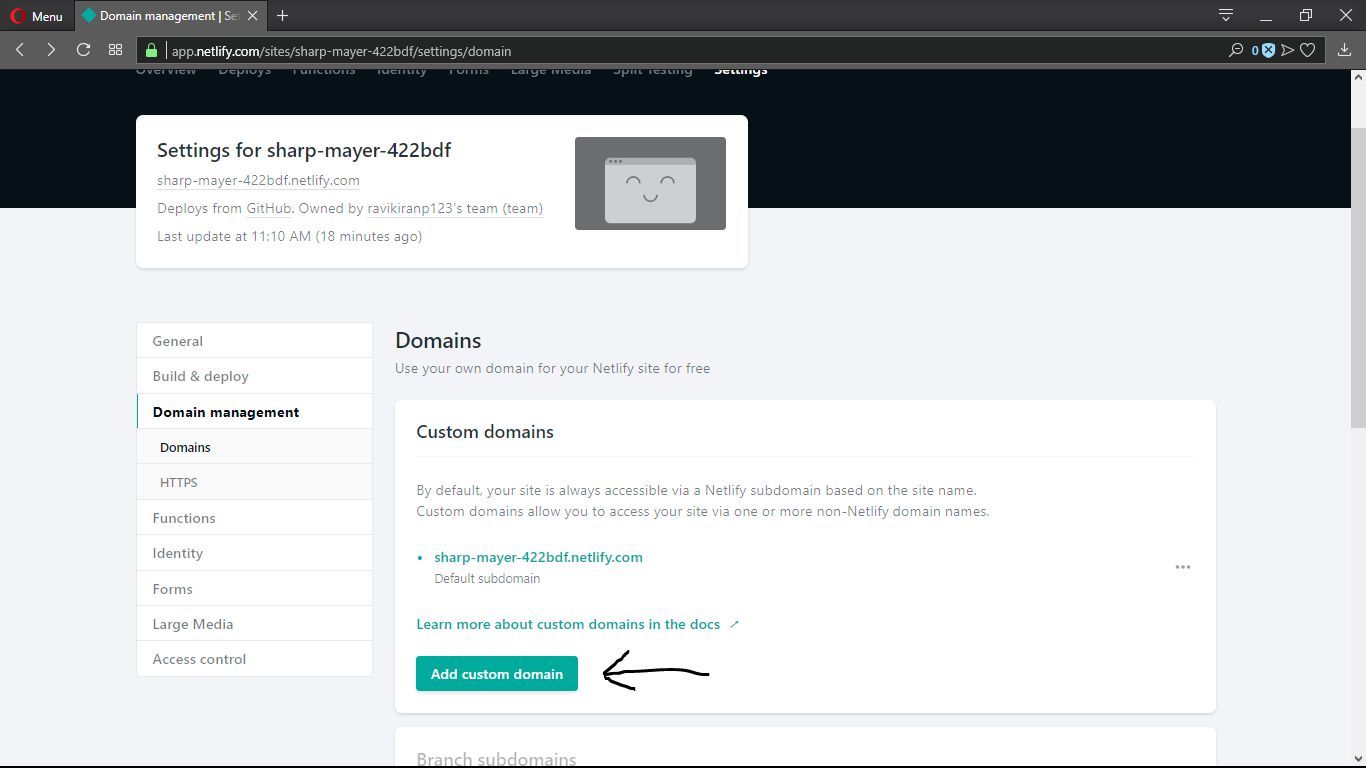
-
You will then be asked to verify your website. Do so.
-
You have an option to either use the Netlify Name Servers or point to the servers on your domain registrar’s panel. If you are going to use multiple subdomains with Netlify, it is recommended to change the name servers as they automate the process of adding a subdomain.
-
Once that’s done, you are recommended to scroll down to HTTPS and click on Force HTTPS.
To access the admin panel, you just need to add /admin to your custom domain URL.
1.6 Forestry
Forestry is an alternative to Netlify and does a similar job of providing a Wordpress like CMS interface to a Jekyll or any other SSG based site generator. You can also import existing static site built using Jekyll or other SSG into Forestry and start using it’s amazing CMS like interface. Here are the steps to get started with Forestry.
-
Head over to
forestry.io -
Login or Register
-
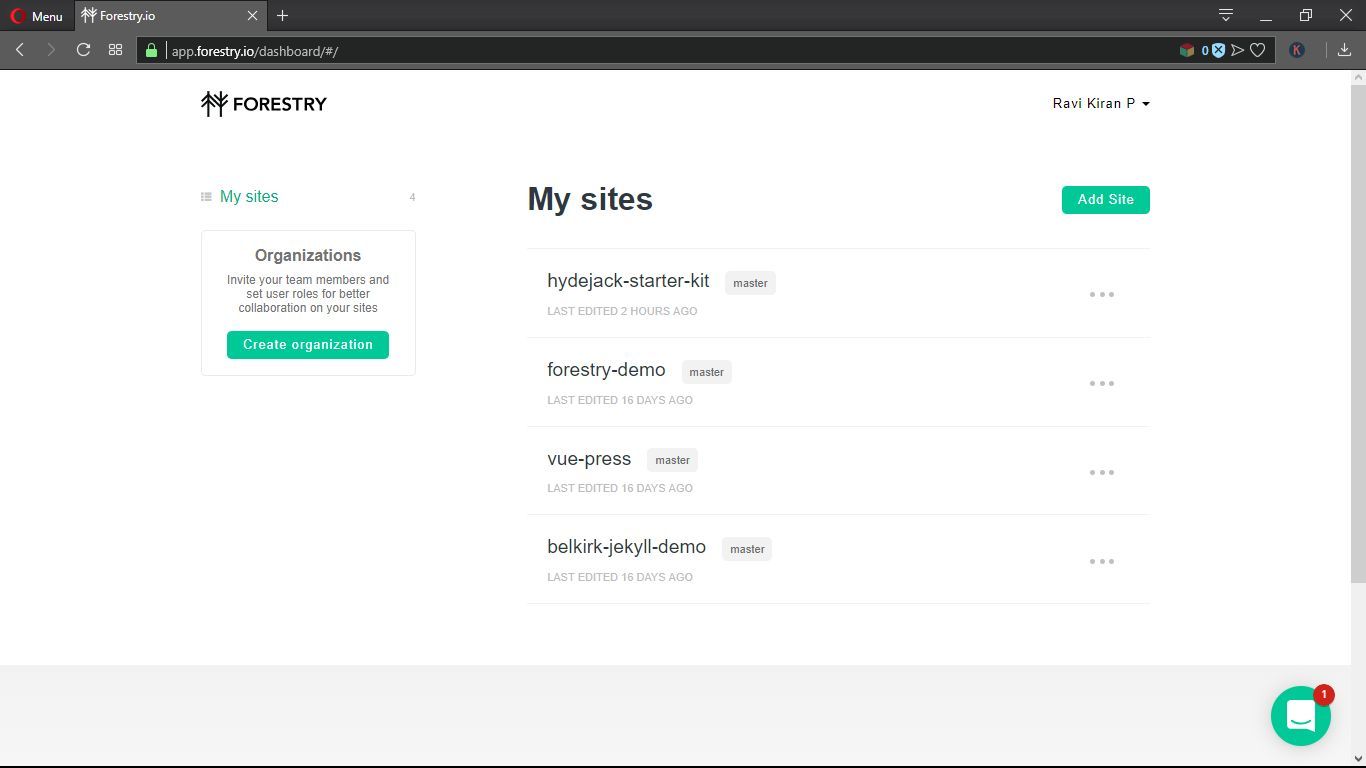
Click on Dashboard on the top left corner. You should be greeted to
something like this:
-
Click on Add Site
-
Select your favourite generator.
-
Select where you want your site to reside. Either GitHub or GitLab.
-
Enter the email ID of anyone else who would write on your blog. If
applicable. -
Once done you should see something like this:
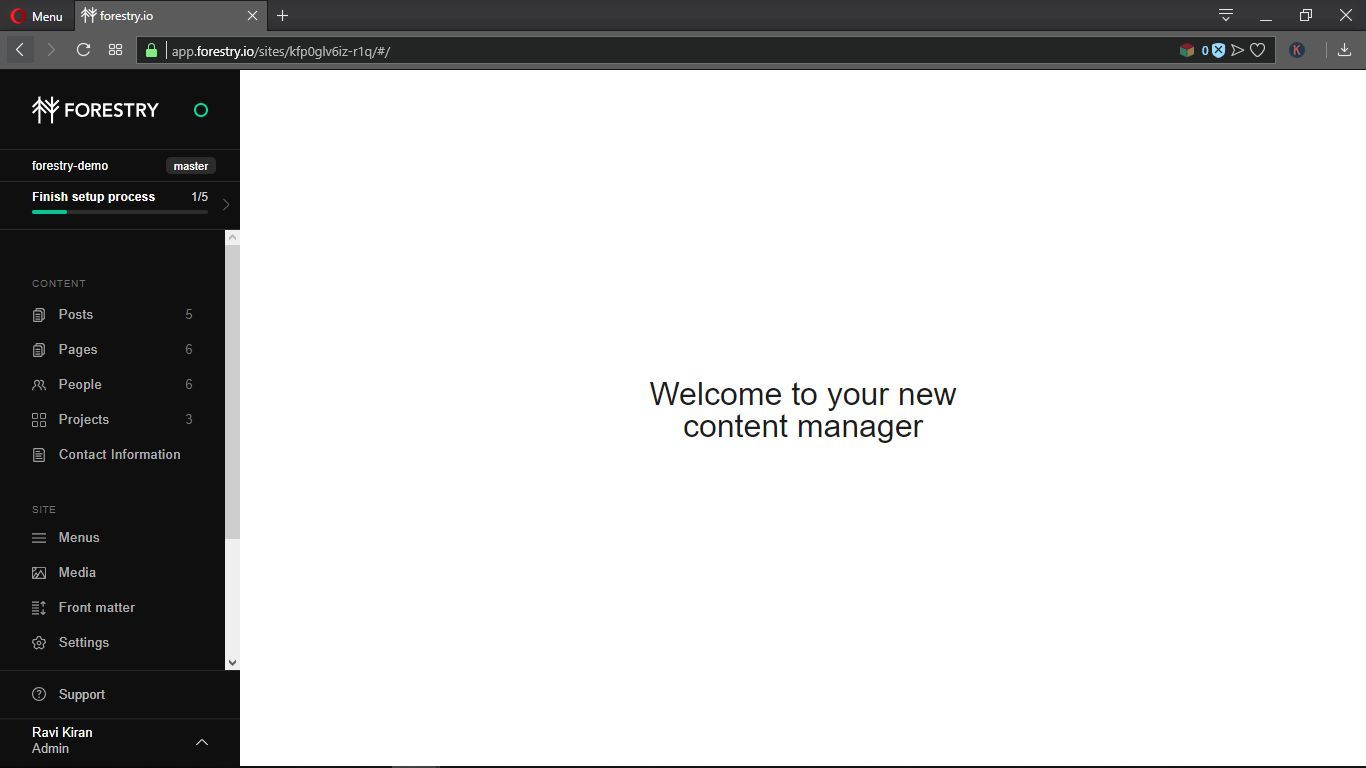
Well, That’s it! You may edit your website to your liking and have posts and
pages just as you would on WordPress.
You may also consider Gatsby and VuePress. They have their own unique advantages depending on your needs.
2. Sway and Hybrid Solutions
If you happen to have an office 365 subscription, you can create full fledged websites and presentations using an app called Sway. It's a very powerfull and versatile app. You can also use the web version. However, it does not give you a way to use it with a custom domain. Thus, to use this method, you need to create an index file on your website and enclose the sway link in it with a width and height of 100%.
Here is a basic way to achieve it:
- Create an index.html at the root of your website and include this code:
<!DOCTYPE html>
<html lang="fr">
    <head>
        <title>Your title</title>
        <meta name="viewport" content="width=device-width, initial-scale=1.0, maximum-scale=1.0, user-scalable=no"/>
    </head>
    <frameset rows="100%">
        <frame src="https://sway.com/s/{swayId}/embed" frameborder="0" marginwidth="0" scrolling="no" noresize="noresize"/>
    </frameset>
</html>
- Make sure to replace {swayId} in https://sway.com/s/{swayId}/embed with your sway's id.
Note: If your office subscription is from a work or school account, the visitor might be asked to sign in if they try to visit the site. This is a major drawback due to a default security setting set by your admin. If you have a personal office subscription though, you can just share your sway to the public by selecting "Share with anyone with a link" and the visitor will not have to sign in to view the website.
Here is a sample website made using this method: This post using sway
3 Cloud Computing
This would have been my first option if not for the fact that they are not
guaranteed to be free for a long term. Here we will be using Amazon’s AWS,
Microsoft’s Azure and Google’s GCP. The first two only offer one year of free VPS of a specific capacity. However, by making multiple accounts, we will be able to use them for longer than that. I would not really recommend this as I am not confident whether Amazon and Microsoft would be okay with you making multiple accounts. However, I can confirm that you can use a single credit card for multiple accounts. Oh, and yeah! You are going to need a credit card for this. That said, Google’s GCP does provide a micro instance for free. So, I would recommend that if you just have one or two WordPress blogs.
I will showcase how you can get started and have a virtual machine instance up and running for each of these. Then further go on to show you how to get
WordPress up and running on them. I will also include the basics of using a web panel call Virtualmin. The second and third parts are common for all the three cloud computing platforms. So, they will be separate. Virtualmin is optional as well. And not really required if you are going to have just one or two blogs. If more, it’s makes your life so much easier.
3.1 Amazon Web Services (AWS)
To get started with AWS, follow these steps:
-
Head over to Amazon Web Services
-
Register if you don’t have an account. Or login if you already have an
account. -
You will then be taken to the AWS Dashboard.
-
On the top right corner, you will be able to see a region dropdown. Click
on it and choose the region where you want your server to be located. -
Then just search for EC2
-
Click Launch Instance.
-
For the AMI, I would recommend Debian. You take your pick. But remember that
if you are going to have a free server only, you will have just about 1 GB
of RAM and 30 GB of SSD Disk Space. -
On step 2 of the process, select t2.micro for free Tier service.
-
Don’t worry about the next screen and skip to Add Storage. I would
recommend adding 30 GB Disk. -
The click on next twice to reach Configure Security Group.
-
If you are going to use only a WordPress blog on this server and no mail
servers or such, you just need to enable HTTP and HTTPS. To do so, just
click on Add Rule twice and change the first one to HTTP from the drop
down in Type. And choose HTTPS for the second type. -
If you are going to use Virtualmin, the following rules are recommended:
-
HTTP
-
HTTPS
-
POP3
-
POP3S
-
IMAP
-
IMAPS
-
Custom TCP Rule with Port number 10000
-
-
-
For each of these, select Source as anywhere.
-
Review and Launch the Instance.
-
Now, let us set up a static IP address. To do so, head over to Network and
Security -> Elastic IPs -
Click on Allocate new address
-
Once you get a new static IP address, right click on it and click Associate
address -
Select your instance
Skip to 3.3 Enable Swap if you wish to skip the tutorials for Azure and
Google Cloud Platform
3.2 Google Cloud Platform
Google Cloud Platform (GCP) is similar to AWS and Azure. It provides a micro
instance free forever that has about 592MB of RAM and 1 vCPU of 2.26GHz. You can easily run 1 to 2 blogs on a server like this. However, you need a credit card that works with 3D Secure. I had quite a bit of trouble with this as my card was not compatible. Thus, I kept this one towards the end. If your card works with this, I highly recommend you go with this.
To get started, follow these steps:
-
Head over to
cloud.google.com -
Sign in if you already have an account. Sign Up otherwise.
-
Go to your console
-
Either select an existing project or create a new one.
-
Set up billing if you haven’t
-
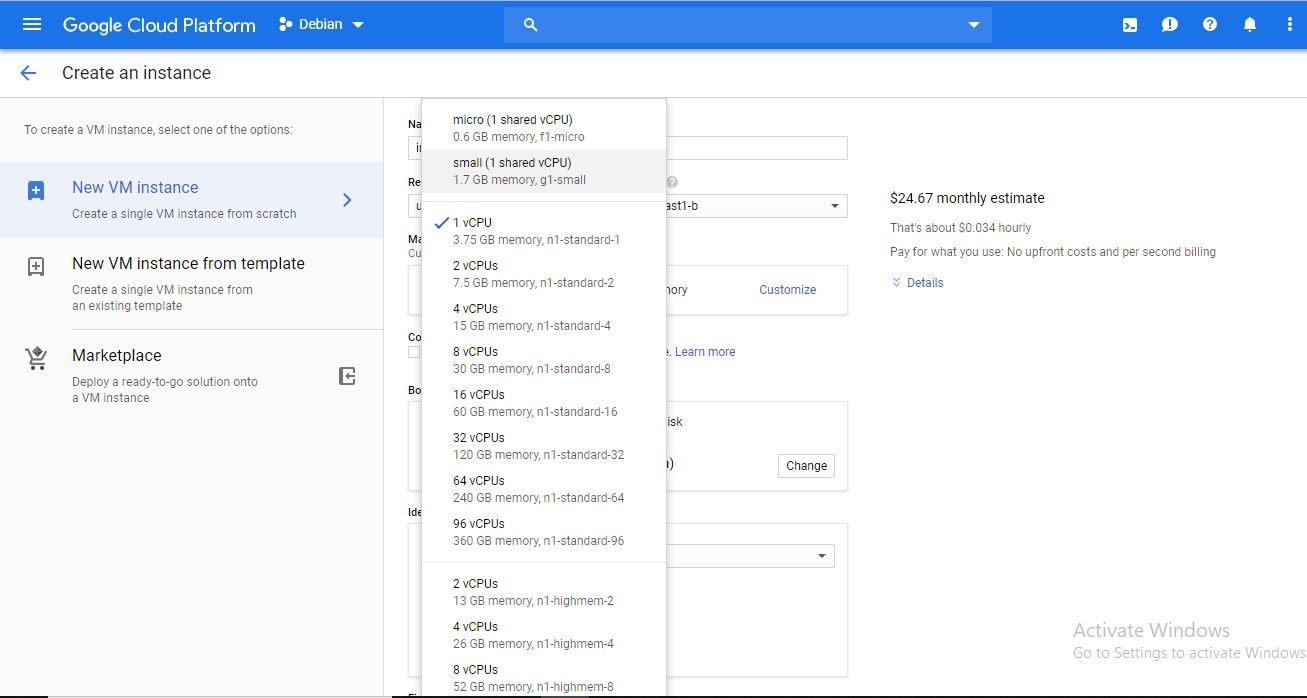
Once all that is done, just click on Compute Engine -> VM instances ->
CREATE INSTANCE

- Under Machine Type, select micro-f1. Make sure you have a “Your first 744 hours of this instance are free” kinda message on the right. If this is available, it is a free forever type and you are good to go. Otherwise, make sure to change your instance location to where is available.
-
Under “Boot disk” click change and change the Disk size to the maximum 30GB.
You may also change the distro here if you so wish. -
Under “Firewall”, tick mark both HTTP and the HTTPS checkboxes.
-
Click create.
-
Well, now that you have your micro instance up and running you may
additionally assign a static IP. To assign a static IP, head over to VPC
Networks -> External IP addresses
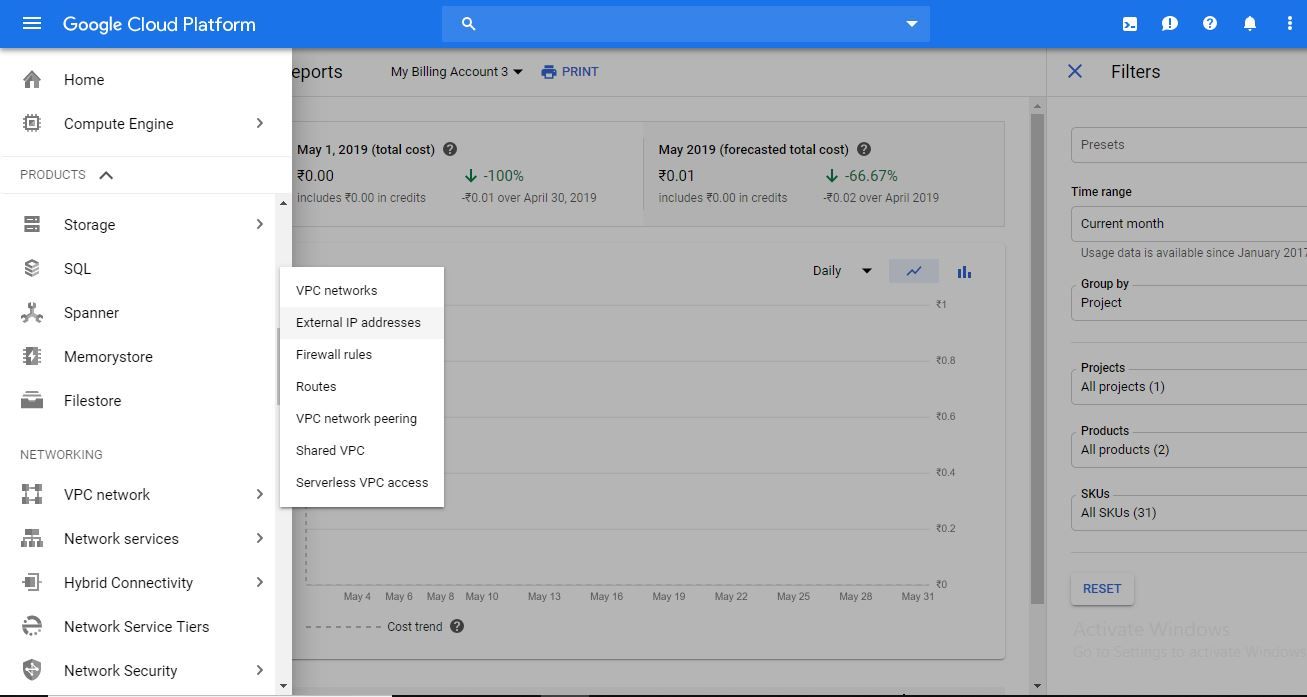
-
You may either reserve a new static address and assign it or turn your already assigned address to static. To do the first, click on RESERVE STATIC ADDRESS at the top and follow instructions. To convert the existing address to static, just click on the place where it says “ephemeral” and change it to static.
-
Give a name and create it.
-
Continue on to the next section to enable swap and then if you are
interested, install Virtualmin.
3.3 Enable Swap
If you are going to use only the free versions, you will soon notice that you get only 1GB RAM on AWS and an even lesser 592MB on GCP’s forever free Micro server. This is not even enough for the distro most of the times. So, you will need something called a swap file. This is similar to a pagefile in windows where the system offloads lesse used RAM content to the hard disk. Depending on whether you have an SSD or a Magnetic Disk setup, the usefulness of this varies. Nonetheless, I highly recommend having swap setup.
To setup swap follow these steps:
-
Connect to your server over SSH and execute the following commands.
-
sudo fallocate -l 2G /swapfile
-
sudo dd if=/dev/zero of=/swapfile bs=2048 count=1048576
-
sudo chmod 600 /swapfile
-
sudo mkswap /swapfile
-
sudo swapon /swapfile
-
sudo nano /etc/fstab (This will open nano. A text editor. Use the web to
understand how it works)-
Add “/swapfile swap swap defaults 0 0”
-
Press Ctrl+x
-
Press y
-
Press Enter
-
That’s it! This will setup a swap of 2GB. You can check if it’s working or not
by using the command htop.
Note: If you need more or less swap, just change 2G in step 2 and bs=2048 in
step 3. It will be a multiple of 1024 for every GB.
3.4 Installing WordPress
If you are going to use Virtualmin, skip this section and move to the next
section.
Installing WordPress is a rather straightforward process.
-
Install LAMP server
-
Let’s make our job easier by using an app called tasksel. To install
tasksel type in -
$ sudo apt install tasksel
-
$ sudo tasksel install lamp-server
-
$ sudo apt install php-curl php-gd php-mbstring php-xml php-xmlrpc
-
-
Setup SQL
-
$ mysql -u root
-
> CREATE DATABASE wordpress;
-
> GRANT ALL ON wordpress.* TO 'wordpressuser' IDENTIFIED BY
'Secure1234!'; -
> quit
-
$ mysql_secure_installation
-
NOTE: Make sure to change the username in step c.
-
-
Configure Apache conf for website
-
$ sudo nano /etc/apache2/sites-available/example.com.conf
-
Enter the following in it:
-
<Directory /var/www/example.com>
Require all granted
</Directory>
<VirtualHost *:80>
ServerName example.com
ServerAlias www.example.com
ServerAdmin webmaster@localhost
DocumentRoot /var/www/example.com
</VirtualHost> -
$ mkdir -p /var/www/example.com
-
$ a2dissite 000-default.conf
-
$ a2ensite example.com.conf
-
$ systemctl reload apache2
-
-
Edit the following in /etc/php/7.2/apache2/php.ini OR /etc/php7.0/php.ini
depending on your PHP version.-
max_input_time = 30
-
upload_max_filesize = 32M
-
post_max_size = 24M
-
-
Install Wordpress
-
$ cd /var/www/example.com
-
$ tar -xzvf latest.tar.gz
-
3.5 Installing Virtualmin
Virtualmin is a web panel like cPanel and Plesk. But unlike those two, it’s
free. It makes a lot of things extremely easy. Follow these steps to install
Virtualmin:
-
$ wget http://software.virtualmin.com/gpl/scripts/install.sh
-
$ sudo /bin/sh install.sh
-
Just press y and enter when asked.
-
It will take a moment to install Virtualmin.
-
Type in $ sudo passwd root and then a password of your choice. This will be
used to log into Virtualmin. -
Once the password is set, open a browser and type in the external IP of your
instance followed by a colon and 10000 ex:- 1.2.3.4:10000 -
If you have set your firewall rules properly, you should see a page that
shows you a warning that the website certificate is not trustworthy. This is
because it is a self-signed certificate. -
Just click advanced and proceed. Or click on proceed anyway depending on
your browser. -
Follow the post installation steps to suit your instance capacity and your
requirements. -
Once that is done, you are good to go! Just click on Create new Virtual
Server and you will have your new website working perfectly. -
Some tips:
-
Make sure to Enable SSL website in the options when you are about to
create a new website. -
Keep the SQL configuration to Medium. This is asked in the post
installation setup. -
You may set up a static IP. This isn’t mandatory but recommended.
-
Well! That’s pretty much it for this comprehensive tutorial. Please do share if you found this useful. It will also make my months of effort writing this
article feel appreciated.
In the next part, I will show how to use your old equipment like smartphones and laptops to host your website and make them accessible from the internet.
UPDATE: There were security issues with virtualmin where source was compiled with malware and went unnoticed for more than 7 months or so. Though this was fixed, it has caused concern. I no longer use virtualmin but rather use captain rover and ghost cms. I will write about this in another post.
Also, GCS will no longer provide a free public IP from Jan 2020. You will no longer be able to use the method posted in this post. Luckily, Oracle has come up with a much better always free VPS servers option. I will write about that as well. See you soon!